我们可以在数据流的管道中,使用 Operators 对上游的数据进行各种操作,然后再发送给下游的订阅者,这就是 Operators 的作用。
Combine 提供了大量的 Operators 给我们使用,鉴于内容过多,笔者将其分为三个小节。
后续内容用了部分弹珠图来加深理解,有兴趣的读者可以进一步了解:Marble Diagrams。
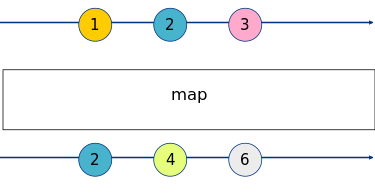
Map
map
1
2
3
4
5
6
7
8
|
[1, 2, 3].publisher
  .map { v -> Int in v * 2 }
  .sink(receiveValue: { print($0) })

// print
2
4
6
|
map 还能使用 keyPath 进行操作,最多支持三个属性。
 1
 2
 3
 4
 5
 6
 7
 8
 9
10
11
12
13
14
15
16
17
18
19
|
struct Person {
  var name: String
  var age: Int
}

let subject = PassthroughSubject<Person, Never>()

subject
  .map(\.name, \.age)
  .sink { name, age in
    print("Name: \(name), age: \(age)")
  }

let p = Person(name: "Steve Jobs", age: 56)

subject.send(p)

// print
Name: Steve Jobs, age: 56
|
tryMap
tryMap 功能与 map 类似,不过它多了一个功能:允许抛出错误。
 1
 2
 3
 4
 5
 6
 7
 8
 9
10
11
12
13
14
15
16
17
18
19
|
enum SomeError: Error {
  case someErr
}

[1, 2, -1, 3].publisher
  .tryMap { v -> Int in
    if v < 0 { throw SomeError.someErr }
    return v * 2
  }
  .sink(receiveCompletion: {
    print($0)
  }, receiveValue: {
    print($0)
  })

// print
2
4
failure(__lldb_expr_17.SomeError.someErr)
|
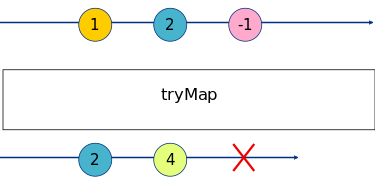
这里的红 X 表示遇到错误而终止。
scan
 1
 2
 3
 4
 5
 6
 7
 8
 9
10
|
[1, 2, 3].publisher
  .scan(10, { v1, v2 -> Int in
    v1 + v2
  })
  .sink(receiveValue: { print($0) })

// print
11
13
16
|
tryScan
tryScan 同 tryMap,允许抛出错误。
flatMap
将上游的 publisher 发送的所有数据转换成一个新的 publisher。
 1
 2
 3
 4
 5
 6
 7
 8
 9
10
11
12
13
14
15
16
17
18
19
20
|
struct JSONModel: Codable {
  var userId: Int
  var id: Int
  var title: String
  var body: String
}

let subject = PassthroughSubject<Int, Error>()
let cancellable = subject.flatMap { id -> AnyPublisher<JSONModel, Error> in
  let url = URL(string: "https://jsonplaceholder.typicode.com/posts/\(id)")!
  return URLSession.shared.dataTaskPublisher(for: url)
    .map { $0.data }
    .decode(type: JSONModel.self, decoder: JSONDecoder())
    .eraseToAnyPublisher()
}
.sink(receiveCompletion: { print($0) }, receiveValue: { print($0) })

subject.send(1)
subject.send(2)
subject.send(3)
|
上例是一个网络请求的示例,我们分别发送 1、2、3 三个 id,请求相应的 JSON 数据并打印。flatMap 会在闭包内将接收到的数字转换成 URLSession.DataTaskPublisher,然后经过 map、decode、 eraseToAnyPublisher 转换成最终的 AnyPublisher<JSONModel, Error> 类型。当网络请求结束后,控制台会打印三个 JSONModel 的实例。
flatMap 默认可转换的 Publisher 数量是无限大的,我们可以通过 maxPublishers 参数指定其最大的并发数。比如我们将上面的代码加以改造:
1
|
subject.flatMap(maxPublishers: .max(1)) { ... }
|
这样一来,我们只会收到一个网络请求的结果。
setFailureType
1
2
3
4
5
6
|
let pub1 = [1, 2, 3].publisher
let pub2 = CurrentValueSubject<Int, Error>(0)
let cancellable = pub1
  // .setFailureType(to: Error.self)
  .combineLatest(pub2)
  .sink(receiveCompletion: { print($0) }, receiveValue: { print($0) })
|
如上代码的意思是将 pub1 和 pub2 发送的数据通过 combineLatest 操作符将它们的最后一个数据组合成元组,然后发往下游。
但是问题来了,pub1 的 Failure 类型是 Never,pub2 的 Failure 类型是 Error,这回导致类型不匹配,无法编译通过。
我们打开注释处的代码,通过使用 setFailuerType 操作符转换错误类型可以解决上面的问题这里有个前提条件,被转换的 publisher 的 Failure 类型必须为 Never。
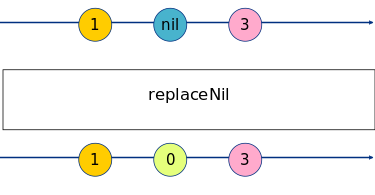
replaceNil
1
2
3
4
5
6
7
8
|
[1, nil, 3].publisher
  .replaceNil(with: 0)
  .sink(receiveValue: { print($0!) })

// print
1
0
3
|
Filter
filter、tryFilter
1
2
3
4
5
6
7
|
[1, 2, 3].publisher
  .filter { $0 > 1 }
  .sink(receiveValue: { print($0) })

// print
2
3
|
tryFilter,略。
compactMap、tryCompactMap
compactMap 可以过滤掉可选值中的 nil。
1
2
3
4
5
6
7
|
[1, nil, 3].publisher
  .compactMap { $0 }
  .sink(receiveValue: { print($0) })

// print
1
3
|
tryCompactMap,略。
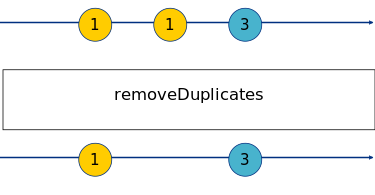
removeDuplicates、tryRemoveDuplicates
1
2
3
4
5
6
7
|
[1, 1, 3].publisher
  .removeDuplicates()
  .sink(receiveValue: { print($0) })

// print
1
3
|
tryRemoveDuplicates,略。
replaceEmpty
1
2
3
4
5
6
|
[].publisher
  .replaceEmpty(with: 0)
  .sink(receiveValue: { print($0) })

// print
0
|
replaceError
用指定值替换数据流中的错误。
 1
 2
 3
 4
 5
 6
 7
 8
 9
10
|
let subject = PassthroughSubject<Int, SomeError>()
subject
  .replaceError(with: 0)
  .sink(receiveValue: { print($0) })
subject.send(1)
subject.send(completion: .failure(SomeError.someErr))

// print
1
0
|
Reduce
reduce、tryReduce
1
2
3
4
5
6
|
[1, 2, 3].publisher
  .reduce(0, { v1, v2 in v1 + v2} )
  .sink(receiveValue: { print($0) })

// print
6
|
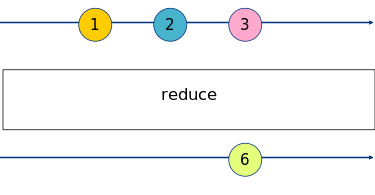
tryReduce,略。
collect、timeGroupingStrategy
collect 不带参数时,会收集所有上游的数据,将其暂存在内存中,直至收到上游的 publisher 发送的 completion 时,它会将所有收集到的数据以数组的形式发送出去。如果上游发送了错误事件,collect 会向下游传递错误。
1
2
3
4
5
6
|
[1, 2, 3, 4, 5, 6].publisher
  .collect()
  .sink(receiveValue: { print($0) })

// print
[1, 2, 3, 4, 5, 6]
|
我们还可指定收集数据的数量,比如我们将 collect() 改成 collect(4),publisher 就会在每收集到 4 个数据触发发送事件。这时控制台会打印:
1
2
3
|
// print
[1, 2, 3, 4]
[5, 6]
|
除了直接使用数字给 collect 传参外,我们还可以通过传递 timeGroupingStrategy 参数来指定收集数据的策略。timeGroupingStrategy 是一个枚举类型,包含一下两种策略:
- byTime:每隔一段时间,发送一次收集到的数据
- byTimeOrCount:每隔一段时间,或收集到指定数量的数据时,就发送一次收集到的数据
1
2
3
4
|
let cancellabel = Timer.publish(every: 0.6, on: .main, in: .default)
  .autoconnect()
  .collect(.byTime(RunLoop.main, .seconds(2)))
  .sink(receiveValue: { print($0) })
|
上面的代码会在每 2 秒收集一次数据,因为定时器每 0.6 秒产生一个数据,那么第一个 2 秒过后,会发送一次数据,包含三个时间。
我们将收集策略稍作调整:
1
|
.collect(.byTimeOrCount(RunLoop.main, .seconds(2), 3))
|
这表示每 2 秒或收集到 3 个数据后就发送一次数据,那么订阅者第一次接收到数据的时间就不再是 2 秒,而是 1.8 秒,因为此时定时器已经产生了 3 个数据。
ignoreOutput
忽略所有上游发送的数据,只向下游传递 completion(finish 或 failed)。